

White-label customer portal for subscriptions: a planning checklist
Plan a white-label customer portal for subscriptions: who handles cancellations and invoices, how VAT is applied, and what to test before launch.
At a glance
Plan a customer portal around responsibilities, not the logo: who handles cancellations, plan changes, billing details, invoices and complaints. In Komashi, white-label means your provider name, logo, colors, language and legal links on your provider subdomain; custom domains are not among the provider settings. Customers sign in without a password and manage their subscriptions, billing profiles and invoices there; provider rules decide whether plan changes are allowed and when a cancellation takes effect. Walk through the main scenarios for each role before launch.
What does a white-label customer portal need?
A white-label customer portal for subscriptions starts with one decision: who handles each customer task. Cancellations, plan changes, billing detail updates, invoice downloads, complaints: if you cannot say whether the customer does it, your team does it or Komashi does it, the portal will look good and your support inbox will stay full.
In Komashi, customers see your plans and subscribe on your storefront, and after signing in they manage their subscriptions, billing profiles and invoices in the customer portal on the same page. White-label here means your provider name, logo, color palette, language and links to your legal documents. The page runs on your provider subdomain, for example yourbrand.komashi.com; custom domains are not among the provider settings.
The checklist works in four steps: responsibility matrix, brand and sign-in, subscription and invoice access, then test scenarios. If you are still connecting your first service, start with the subscription website launch checklist.
Who handles each customer task?
The matrix shows the usual split of tasks; where a cell says if your rule allows it, your provider rules decide. Admin and operator here are roles in the provider’s team; the Users and Permissions guide explains the difference. The last column covers Komashi plus the payment and invoicing providers you connect.
| Task | Customer | Provider admin | Provider operator | Platform and integrations (Komashi, payment, invoicing) |
|---|---|---|---|---|
| Start a subscription | Self-service on the storefront or an embedded widget | Sets up services and plans | – | Payment runs through your payment provider |
| Upgrade or downgrade | Self-service, if your rule allows it | Enables or disables it; can change plans too | – | – |
| Cancel | Self-service in the customer portal | Chooses the mode (period end or immediate stop); can cancel on the customer’s behalf through the REST API | – | – |
| Billing details (name, country, VAT number, address) | Edits them in a billing profile | Chooses automatic sync or approval | Reviews customer data | – |
| View and download invoices | Self-service from the subscription | Connects an invoicing provider or chooses manual external invoicing | Views a customer’s issued invoices | With a connected invoicing provider, the invoicing provider issues the invoice after a successful payment |
| Discount | Can redeem a coupon code you give them | Creates coupons; can allow operator discounts | Only if an admin allows it | – |
| Complaint about the service, refund | Contacts you via the details on your storefront | Responsible; decides on refunds | Handles the case | – |
| Login, loading or account problem | Opens the support panel with the ? icon; emails info@komashi.com if they cannot sign in | – | – | Komashi support |
| Team members and roles | – | Invites, changes roles, removes users | Cannot change provider settings | – |
Three items are easy to overlook:
- Operator discounts. Provider rules can let operators add discounts at checkout. An operator can then set a 0 price or a 100% discount, so enable it only if you trust every operator. Coupon codes are separate: you create them under Coupon management, with an optional usage limit per customer.
- Billing detail changes. With automatic sync turned off, a customer’s edits wait for your approval (see the Provider rules guide). That gives you control, but someone on your team has to approve them regularly.
- The complaint and cancellation route. The contract is between the customer and you, the provider, so service quality, cancellations and refunds are yours; customers see your contact details on your storefront. If someone cancels by email, ask them to do it in the customer portal, or cancel on their behalf through the REST API if you have an integration. Komashi handles platform issues (login, loading, account, data): customers open the support panel with the ? icon and describe the problem on the Chat tab; if they cannot sign in at all, they email info@komashi.com. See How do I contact Komashi support?. Spell out this split in your terms too.
Brand and sign-in
Branding comes down to three decisions, each with a consequence.
1. Name and subdomain. Set both under Settings → Basic (Basic settings guide). The subdomain may use letters, numbers and hyphens, with at least 3 characters. Changing it changes your public URL, and links to the old subdomain stop working. Settle it before you send the first email or print the first flyer.
2. Logo, colors, language. You upload your logo as PNG, JPG or WebP. The uploaded image is served from a public image URL because it appears on your storefront, in widgets and in the notification emails Komashi sends to your customers, so only upload an image you are happy to make public. Pick the Color palette manually or generate one with AI. The provider language is your storefront language; it is not the same as the language in your own profile.
3. Legal links. Your privacy policy and terms are your documents, hosted on your site. In the settings you only add their URLs. For your customers’ personal data, you are the controller and Komashi acts as your processor under the Data Processing Agreement; your privacy policy should reflect that. State in your terms where customers can reach you about their subscription.
How do customers get in?
Komashi uses passwordless login: Google sign-in or a login link sent by email. You never have to handle password resets, but prepare a short reply for when the link does not arrive (spam folder, mistyped address). The login link arrives in the customer’s preferred language.
There are two entry routes:
| Entry route | When it fits | What to watch |
|---|---|---|
Storefront link (yourbrand.komashi.com) | Quick start with no extra website work; link it from emails or your own site | Finalize the subdomain; the customer portal lives on the storefront |
| Embedded widget on your own site | Your customers already sign in to your app and you want to show their subscription there | Subscription Details needs an individual subscription ID; your backend decides which signed-in visitor may see which subscription |
With the widget, the browser receives the IDs placed in the HTML, so an arbitrary ID copied from a URL does not prove that the visitor is entitled to that subscription. Check authorization on your server; the widget script never contains an API key. Steps and attributes are in the widget embedding guide; the developer overview helps you choose between widgets, the API or both.
Subscription and invoice access
A signed-in customer sees this in the customer portal:
- Home: your landing page with plan comparison, add-ons and one-time services.
- My subscriptions: each subscription’s plan, status and price, grouped by billing profile. Customers can cancel, change plans if you allow it, and open related invoices.
- Billing Profiles: one or more billing identities, for example personal and company, each with its own subscriptions and invoices.
- Notifications in the header for subscription and invoice updates, plus a provider switcher if they buy from several Komashi-powered providers.
Four settings decide how self-service your portal is. All of them sit under Settings → Provider rules:
- Allow plan upgrades and downgrades. When enabled, customers and admins can change active plans; when disabled, plan changes become a support task. On an upgrade, the price difference is prorated for the rest of the current period and paid the same day; the new recurring price applies from the next renewal. A downgrade takes effect at the end of the billing cycle, and the difference is not refunded. Follow individual subscriptions in the Subscriptions view.
- Subscription Cancellation. Continue Until Period End or Immediate Stop. State the same rule in your terms, otherwise the portal and your documents disagree.
- Allow company customers. When enabled, customers can subscribe as a company with a company name and VAT number. Turn it off if you only sell to individuals.
- Customer Extended Data. Require custom fields when a billing profile is created, for example a license plate number. Ask only for what you really need.
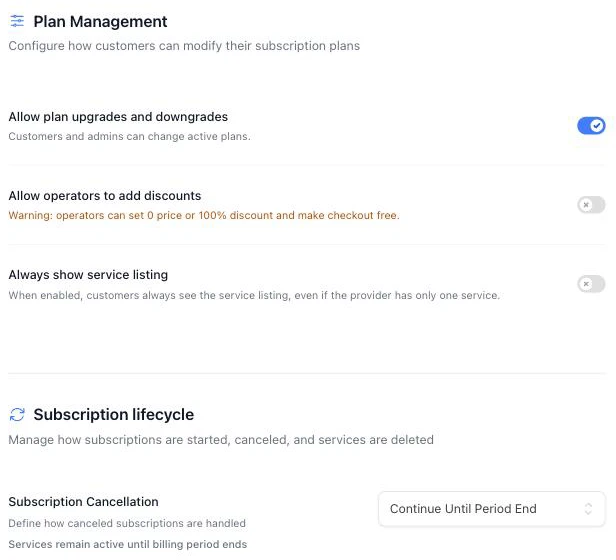
The Provider rules page in the Control Center (from the Komashi documentation): plan changes on, operator discounts off, cancellation continues until period end.
Illustrative example: a monthly maintenance plan for business customers
A hypothetical scenario, not customer data. A small web development team sells monthly site maintenance to companies. While planning, they decide:
- Company customers: on, because every buyer is a company with a VAT number.
- Shared billing profile: this is a permission inside the buying company, not a role in the provider’s team. Billing profiles have their own roles: on the customer’s side, the managing director runs the profile as Admin and invites their bookkeeper as User. User is read-only: they can view the profile, subscriptions and invoices but cannot edit or invite anyone. The bookkeeper downloads invoices directly instead of emailing the developers.
- Automatic sync: off. When a customer changes their address or VAT number, the team’s admin approves it before it reaches the next invoice.
- Cancellation: continue until period end, because the month’s work is already scheduled.
- Plan changes: allowed, because moving to a larger plan is a common request; the customer pays the prorated upgrade fee straight away.
- Operator discounts: off; only the admin grants discounts, through coupon codes.
The output is a short written rule list that can be repeated word for word in the terms, the FAQ and the internal support notes.
Gross vs net price: how VAT is applied
This section applies if you sell in the EU or the UK and charge VAT. If you also sell to businesses, plan how customers read your prices. In Komashi you enter prices as net amounts, and the gross amount is calculated from your default tax class. The VAT actually charged is decided at checkout, from the service’s VAT type, the seller and customer countries and the customer’s tax status, so it can differ from the gross amount based on your default tax class. The Billing country rules under Settings → VAT and Tax Profiles control this:
- Rules work by the customer’s billing country, with a separate Business rule (company tax ID) and Personal rule (no company tax ID) for each country.
- For each you choose Automatic rulebook (the default), Charge VAT or No VAT.
- The Business rule applies only when the customer provides what it requires: a VIES-checked VAT number for EU countries, a tax ID elsewhere.
- Customers from a Disabled billing country cannot buy.
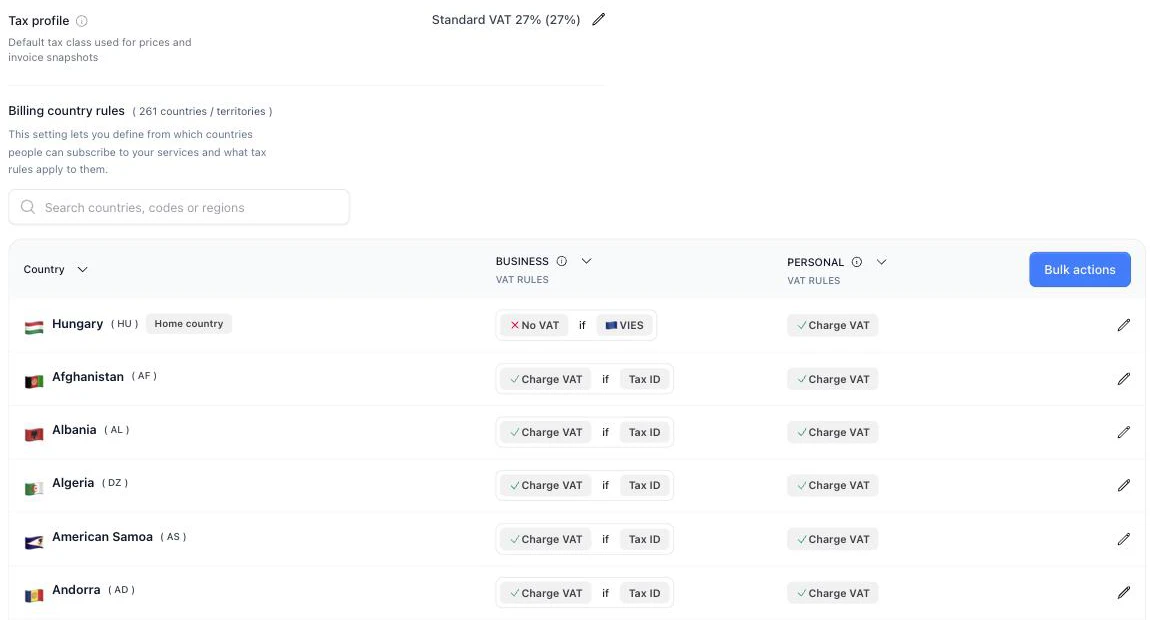
The VAT and Tax Profiles page (from the Komashi documentation). The rules shown belong to a demo account and are not recommended values: set your own countries with your accountant.
The same plan can therefore carry different VAT depending on the billing profile the customer picks. Check what amount appears before payment, and how it changes once a billing profile is selected, with test 10 on your own service before launch.
Label prices as net or gross the same way in your price list, terms and support replies; for consumers in the EU and the UK, prices generally have to be shown including VAT. Settings are explained in the VAT and Tax Profiles guide. This is not tax advice: agree the right VAT settings and price display with your accountant.
Test scenarios before launch
Run this list against your own service, in this order. There is no separate test or sandbox mode, so testing involves real money and real invoices.
Before you start:
- Test service. Create a separate test service with at least two plans, so you can try both an upgrade and a downgrade. Set the lowest price you can, but not below your payment provider’s minimum charge. Keep Status set to Active only while you test: while it is active, anyone with the link can buy it. Hide or delete the service afterwards.
- Rules. Test with the settings you plan to go live with. Where a row describes two branches (for example plan changes allowed or not), expect only the result for your own setting. For rows 6 and 10, turn on Allow company customers. On the test service, turn on Allow multiple subscriptions, because the test customer subscribes again in rows 8 and 10; for row 8, also turn on Available for operators.
- Accounts. You need a test customer with your own email address, a second email address for the User invited in row 6, and an operator account; you act as the admin.
- Disabled country. Row 11 only works if you have a billing country set to Disabled; if you do not, skip it.
- Cost and cleanup. Expect 2–4 real charges, depending on your settings: rows 2 and 10 always involve a payment, row 4 only when plan changes are allowed, and row 8 if a subscription created by an operator starts a payment. With a connected invoicing provider, real invoices are created. Cancel the test invoices with a credit note in your invoicing provider and refund the card charges with your payment provider: the credit note alone does not return the money.
| # | Who tests | Scenario | Expected result |
|---|---|---|---|
| 1 | New customer | Opens the storefront link and signs in with an email link; in another browser, with Google too | Both sign-in paths work; your logo and name are visible |
| 2 | Customer | Subscribes to the smaller test plan with a personal profile; records the pre-payment amount and, with a connected invoicing provider, the invoice VAT | The subscription appears under My subscriptions as active |
| 3 | Customer | Opens the invoice after a successful payment (with a connected invoicing provider) | The invoice shows your billing details and the customer’s chosen billing profile |
| 4 | Customer | Upgrades to the larger plan | With plan changes allowed, the prorated fee is due the same day (when disabled, the change is not available) |
| 5 | Customer | Switches back to the smaller plan (only if plan changes are allowed) | Nothing changes immediately: the downgrade shows as scheduled and takes effect at cycle end, with no refund |
| 6 | Business customer | Creates a billing profile with a VAT number and shares it with a User | The invited user sees invoices but cannot edit |
| 7 | Customer | Changes their address | With sync off, waits for approval (with sync on, applied straight away) |
| 8 | Operator | Creates a subscription on the test service for the test customer and tries to add a discount | The subscription is created; a discount is possible only if operator discounts are enabled |
| 9 | Customer, optional: widget integrations only | Opens their subscription details inside your app | Only their own subscription loads; your backend rejects a different ID |
| 10 | Business customer | Subscribes to the same plan with the business profile from row 6; records the pre-payment amount and the invoice VAT and compares them with row 2 | VAT for each profile follows the billing country rule and matches your net or gross labeling |
| 11 | Customer, optional: disabled country only | Tries to subscribe with a disabled billing country; notes the message shown | The purchase cannot be completed |
| 12 | Customer | Cancels all test subscriptions | Stays active until period end (with Immediate Stop, ends at once) |
| 13 | Admin | Last: deletes the test customer | The customer becomes archived and read-only |
Add the message from row 11 to your support replies. Row 13 cannot be undone, so run it only after the others. The deletion dialog says active subscriptions end at the end of the billing period, and invoices and history remain.
If a row does not give the expected result, fix the rule or the responsibility matrix, not the portal’s look. Keep the list as a regression check for when you add a new plan or add-on.
Next step
Start with the responsibility matrix, then set your name, subdomain, logo and legal links in the Basic settings guide. Plan changes, cancellation and customer data rules are covered in the Provider rules guide, and the customer portal is described from the customer’s side in Your storefront account.
If you do not have a provider yet, create one on Komashi and use the test list above to walk through the customer journey before you launch.
Frequently asked questions
Does the Komashi customer portal run on my own domain?
No: the customer portal is available on your provider subdomain, for example yourbrand.komashi.com, and custom domains are not among the provider settings. If you want subscription details inside your own website or app, use the Subscription Details widget.
Do I have to manage customer passwords?
No. Komashi uses passwordless login: customers sign in with Google or with a login link sent by email. The link arrives in the customer's preferred language.
Can customers cancel their own subscription?
Yes, under My subscriptions in the customer portal. Your provider rules decide whether a cancellation runs until the period end or stops immediately. Customers can change plans only if you allow plan changes.
Who handles complaints about the service?
The contract is between the customer and the provider, so the provider is responsible for service quality, cancellations and refunds. Komashi handles platform issues such as login problems, the account and data: customers open the support panel with the ? icon, or email info@komashi.com if they cannot sign in.
How is VAT applied for personal and business customers?
You enter prices as net amounts, and Komashi calculates the gross amount from your default tax class. The VAT actually charged is decided at checkout from the service's VAT type, the seller and customer countries, and whether the customer buys with a business tax ID (VIES-validated in the EU). The same plan can therefore carry different VAT for a personal and a business customer.
Sources and further reading
- Komashi Docs — Basic settings
- Komashi Docs — Provider rules
- Komashi Docs — Users and Permissions
- Komashi Docs — Your storefront account
- Komashi Docs — Billing Profiles
- Komashi Docs — Report an Issue
- Komashi Docs — How do I log in to my account?
- Komashi Docs — Embed widgets
- Komashi Docs — Customers
- Komashi Docs — VAT and Tax Profiles
- Komashi Docs — Service editor
- Komashi Docs — Coupon management
- Komashi Docs — How do I contact Komashi support?
- Komashi Docs — Developer overview
- Komashi Docs — Subscriptions
- Komashi Docs — Data Processing Agreement
- Komashi Docs — Who is a Provider?
Updated:
More articles
Launch a subscription website: your first-service checklist
Launch a subscription website using your existing site: define an offer, connect a Komashi link or widget, and check payments, invoices and service delivery.
Recurring invoice vs recurring payment: what changes?
Does a recurring invoice collect payment automatically? Compare invoicing and recurring payments with a monthly-service example and a failure-handling checklist.